Hey Lovelies!!! This is just a test tutorial. I did a step by step photo tutorial on how I usually apply my eye makeup. I've gotten a few request on how I do my eye makeup as well as some blending tips. I apply my eye shadow many ways, but this is my favorite one ^_^. I hope you guys like it!
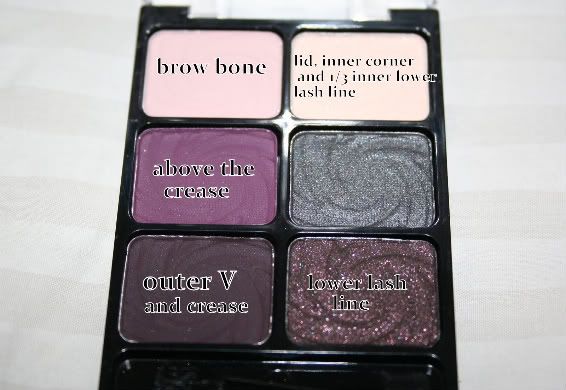
I created a defined and smoky purple eye makeup using my Wet n Wild ColorIcon palette in Lust (wnwbeauty.com) The look is dramatic and you can wear this look to any night time event or occasion. This would be great for prom too^_^.


I created a defined and smoky purple eye makeup using my Wet n Wild ColorIcon palette in Lust (wnwbeauty.com) The look is dramatic and you can wear this look to any night time event or occasion. This would be great for prom too^_^.

1. Apply NYX Eye Base in Skin Tone thinly and evenly all over the lids up to the brow bone using a concealer brush (You can use your finger too). This will help get rid of the discoloration on the lids.

2. Set it with MAC Mineralized Skin Finish Natural (or any powder). This will keep the base in place.

3. Apply Urban Decay Primer Potion all over the lids. (LOVE this!)This will prevent the eye shadows from creasing and will make the colors more vibrant.
Wait a moment...I just showed you the ultimate way to prime your eye lids! Do this step and it will make your eye shadows last all freakin' day!!!
Ok moving on...

4. Apply the above the crease with a fat fluffy blending brush (I'm using Sigma Makeup Blending Brush). This will be the transition color from crease to brow bone and it will act as a background for the crease color that I'm going to apply next, giving it a well blended look...if that makes any sense lol.

It should look something this...like a light wash of color.

5. Using an eye shader brush (I'm using EFL $1 Shadow Brush), pick up the shimmery light pink on the palette, then spritz it with water and pat it all over the lids. Wetting the shadow will intensify the color. I also noticed the shimmers disappeared after I did this. Now it looks matte.

It should look something like this.

6. Apply the dark purple on the outer 1/3 of the lid using a pencil brush (I'm using Posh Medium Pencil Brush)

It should look something like this.

7. Starting form the outer corner, apply the same dark purple shadow using the same pencil brush and drag it to the crease stopping half way. (You can add more little by little until you're satisfied with the intensity). Applying a darker shadow will give more definition to the eyes.

It should look something like this.

8. With a very light hand, blend the colors using a medium fluffy blending brush (I'm using Coastal Scents Crease Brush) by doing circular motion then up to the crease going back and forth. Again, do it with a VERY LIGHT HAND!

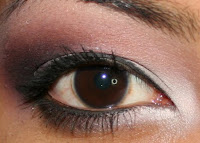
It should look something like this. The colors should look blended and has a nice fade of dark purple to light purple on the crease. Can you see how applying the light purple above the crease helped with the blending?

9. Apply the same shimmery light pink shadow on the inner corner of the eye and 1/3 of the inner lower lash line. This will help the eyes look wider/bigger.

...just like this.

10. Apply the matte light purple shadow on the brow bone using a shader brush. This will help lift up the brow.

11. Apply the shimmer/glittery plum shadow on the rest of the lower lash line using a small pencil brush. (I'm suing Sigma Makeup E30 Pencil Brush) This will frame the eye.

12. Line the water line and the upper lash line with Stila Smuge Pot in black using an angled liner brush (use any black eye liner of your choice).

I extended the line a little bit pass the lash line to create a slight cat eye effect.

13. Curl lashes, apply a generous coat of Maybelline Volum' Express Falsies mascara on upper and bottom lashes.


Finished! Whew...that seemed long lol. I hope this step by step photo tutorial was helpful. Please let me know in the comment below if I should do this more often. Also, I want to know if you guys like the photos small or a little bigger. I made them small because I don't want to scare you with my big eyes!
Ok I gotta sleep now, good night my Lovelies!


No comments:
Post a Comment